There’s something evocative about trees in the autumn (or fall for US readers!). The way the leaves change colour through their magical annual transition, like they’re putting on a show. I find that it makes the dark nights and winter cold a little easier to bear. If I have to give up summer, it might as well go out in style! The good news is that painting trees is much easier than you think for any watercolour beginner. Grab your supplies and let’s go!

What supplies you will need
- Watercolour paper (cold press has a good texture for painting trees)
- Watercolour paints
- Brushes (I find medium and smaller brushes help)
- Water jars with clean water
- Paper towels or cloth to dry your brushes
Colours you’ll need
You’re after warm autumn tones with this one. Try and choose sunny yellows, reds and oranges. I’m using cadmium pigments which are some of my favourites, but I know some artists prefer to stay away from them as they’re made with metal pigments, so you can always switch them for equivalent warm colours in your palette.
- Cadmium Red
- Cadmium Yellow
- Burnt Umber
Painting a watercolour autumn tree – step by step
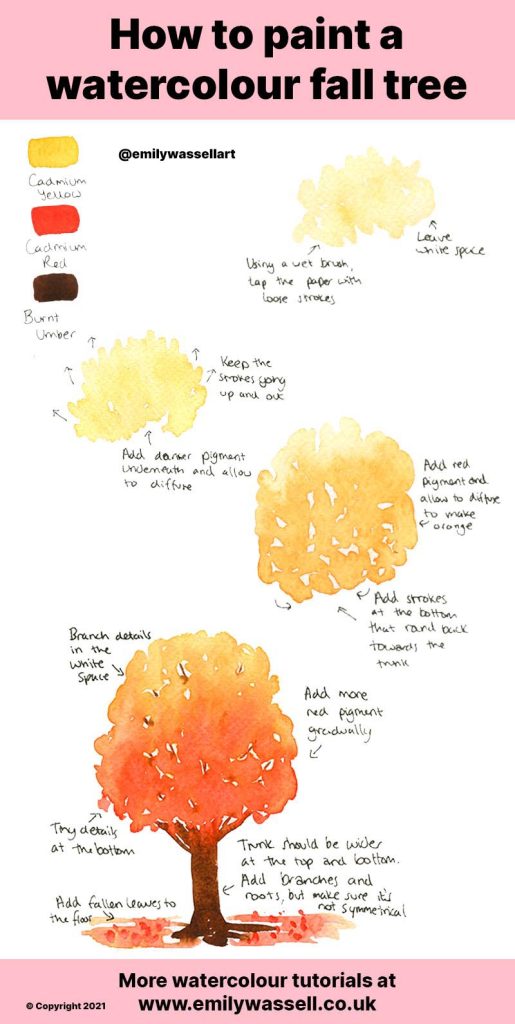
- We’re going to painting in a loose, expressive style for this – no fine details! Load up a medium watercolour brush with a light, watery mix of yellow. Begin making marks on your paper, touching the brush against the paper and picking it back up again. Let the strokes touch but leave white space for a few gaps and don’t overthink it – the idea is to be relaxed!
- Once you have the start of an oval, begin nudging the brush up towards the top, to create a rounded and uneven top for the tree.
- Using another brush, drop in some darker yellow pigment towards the bottom of your shape, allowing it to bleed out. You’re aiming to have the lightest part of your tree at the top, and for it to get gradually darker towards the bottom.
- Begin adding the middle strokes, pulling the brush back towards the centre to create rounded shapes. Use an orange tone by mixing a little red into your yellow, or switch to an orange paint. Leave more white space here to avoid creating a blob.
- Try and work quite quickly so the top of the tree is still wet as you add more paint, so the colours blend and diffuse out naturally.
- Grab some red onto your brush and add a final layer of strokes to the bottom of the tree canopy, rounding it out. Allow the red to diffuse up into the orange. Use the tip of your brush to create tiny strokes around the bottom of the tree in the red colour.
- Mix up your brown – you might want a small brush for this! Create a few light lines in the white space, to show branches connecting up your tree. Let the brown bleed into the leaves.
- Using a larger brush, create the trunk. It’s a thick brown line under the tree, with a few connecting branches that touch the bottom leaves. If these are still wet, it should create beautiful bleeds.
- Make your trunk wider at the bottom and extend out for some roots, to balance the tree without making it too symmetrical.
- Finally, add a little light red colour on the ground and some darker red marks to show fallen leaves. And that’s your tree finished!
More watercolour tutorials
Download my free watercolour supply guide
Feeling overwhelmed and confused by watercolour paints, papers and brushes? Download my free guide filled with insider info, including a list of good supplies for every budget, and my complete supply list!
